Top Page
Detailed Guide
Liquid Crystal Display
"Search through the manual" on the upper right is convenient.
You can search by specifying the terms in the manual.

You can search by specifying the terms in the manual.
This section describes precautions to be taken to prevent injury or damage to users and surrounding property, and to make sure that users can use the display safely. Strictly observe all of these instructions when using this display.
 Warning
A failure to observe any of the precautions specified by this mark may result in the death or serious injury of a user.
Caution
A failure to observe any of the precautions specified by this mark may result in injury or damage to surrounding property.
Prohibition
 Observe the instruction
Warning |
Do not attempt to repair, disassemble, or tamper with this display. Doing so may result in ignition, electric shock, rupture, burn, or malfunction. |
|
Never connect this display to another device if the display has failed or is malfunctioning in any way. If this display fails or operates abnormally, disconnect it from all external devices. If this display is used without first correcting a failure or abnormality, it may catch fire or cause an electric shock. |
|
Never place things on top of the power cord, pull or bend the cord, press the cord against things, or tamper with the cord in any way. Never use the power cord when it is twisted or bent. The conducting wire core in the power cord may break, ignite, or cause short circuits or electric shocks. |
|
Never touch this display or the power cord during a thunderstorm. Failure to observe this warning may result in an electric shock. |
|
Never use a power cord that is not supplied with or designated for this display. A power cord not designated for this display may smoke or catch fire. |
|
Do not place small parts (screws, etc.) and the plastic bags used for packaging within the reach of babies and infants. If babies or infants swallow small parts or put plastic bags over their faces, they may suffocate. |
|
Never get the display wet or use it in a damp environment. If water or a detergent splashes on this display, it may penetrate through gaps and cause sparking or electric shocks. • Never attempt to use the display if it has gotten wet. |
|
When one of the following abnormalities occurs, unplug the power plug from the electrical socket. • If water or foreign matter gets inside this unit. • If this unit emits a bad smell, abnormal noise, or smoke. If you continue to use this unit as it is, it could cause a fire or electric shock. |
|
Do not place the dry batteries within the reach of babies or infants. If a baby or infant swallows a dry battery, suffocation or stomach trouble may result. Immediately contact a doctor if you suspect that a baby or infant has swallowed a dry battery. |
|
Be aware of the following precautions with the dry batteries: An injury or burn may result if the batteries fail, generate heat, rupture, ignite, or leak electrolyte. • Use only designated dry batteries. • Never heat the dry batteries or put them into flames. • Never leave the dry batteries in a place exposed to direct sunlight, a hot and humid place, a vehicle, etc. • Stop using the dry batteries at once if they generate heat, leaks,emit unusual odors, are discolored or deformed, or otherwise appear unusual. • Never use dry batteries with different capacities or of different types or brands. • Remove the dry batteries when they are empty or when they are not to be used for a long time. |
Caution |
Observe the following instructions to prevent eye fatigue: You can view the screen continuously with greater comfort by minimizing differences in brightness between the screen, the surfaces of your keyboard and documents, and the area around and behind the display. When viewing the screen continuously for a long period, try to take a 10- to 15-minute break every hour. Viewing the screen for a long period will tire the eyes. |
|
Never do anything that could damage the surface of the monitor screen. • Never knock or push the screen with excessive force. Doing so may cause damage, failure, or injury. • Never push the screen with a sharp-tipped object. Doing so may cause damage, failure, or injury. • Never rub or tap the screen with something hard. Doing so may damage the screen or cause an injury. |
Displaying the same image for a long period may result in screen burn-in.
• Turn off the power when not using personal computer or display.
• Use the power-saving or screen-saver function whenever possible.
To remove dirt sticking to this display, disconnect the power cord and lightly wipe this display with a soft and clean cloth.
• Never use benzine, thinner, alcohol, antiseptic agents, chemical wipes, cleaners, cleaning paper, etc. to clean the display. Agents like these may degrade or crack the display.
• This display includes life-limited parts (backlight, aluminum electrolytic capacitor, etc.).
• The lifetimes of the life-limited parts depend on conditions such as the frequency of use and usage environment (temperature, humidity, etc.).
• This display is designed for use in general households and offices. Its lifetime may be shortened by use in another environment.
This display is not intended for continuous 24-hour use. It is designed for use within 12 hours a day (environmental temperature 25 °C). Continuous use for long hours will shorten the lifetimes of life-limited parts.
• Bright spots (constantly lit spots) or dark spots (constantly unlit spots) may appear on some monitor screens. This monitor screen has 99.999% or more effective pixels. The remaining 0.001% pixels are missing pixels or bright spots. Bright and dark spots are not failures or defects.
• Visible blurring or uneven brightness may also sometimes appear on the screen, depending on the viewing angle or temperature changes. Blurring and uneven brightness are not failures or defects.
1) This display and this user's guide are literary works of I-O Data Device, Inc. The unauthorized reproduction, copying, and reprinting of and/or alterations to this display or user's guide, whether in whole or in part, are prohibited by law.
2) This display is not intended for use with or incorporation into medical devices, nuclear equipment and devices, aerospace devices, transportation equipment and devices, equipment and devices affecting human lives, such as weapon systems, or equipment and devices requiring high reliability, such as submarine repeaters and space satellites. If you use this display for such equipment, device, control system, etc. and a failure of this display causes an accident resulting in injury or death, fire accident, or social loss, I-O DATA DEVICE, INC. will bear no liability for damages. Users are requested to ensure extremely safe designs, such as redundancy designs, fire retardancy control designs, and designs to prevent malfunctions, for equipment, devices, control systems, etc.
3) Please note that I-O DATA DEVICE, INC. will not assume any liability for the effects of operation of this display on other equipment, devices, or systems, even when the safe designs described above are ensured.
• All company names, product names, etc. referred to in this user's guide are, in general, the trademarks or registered trademarks of respective companies.
• HDMI, the HDMI logo, and the High-Definition Multimedia Interface are trademarks or registered trademarks of the HDMI Licensing Administrator, Inc.
Switch the input port connected to the input source you are using.

Press any of the buttons.
Press the button just above the ▼mark on the back of the monitor to operate the buttons.
The button guide appears.
Press the [Input Switch] button.
Select the input port connected to the input source you want to display.
⇒ The images sent to the selected input port appear.
The button guide displays for Steps 1 and 2 can be skipped.
See "One-step operation."
Need to allow increasing power consumption.
See Volume(Vol.) / Brightness cannot be set to the maximum value.
Press any of the buttons.
Press the button just above the ▼mark on the back of the monitor to operate the buttons.
The button guide appears.
Press the [Audio Volume] button.
Adjust the audio volume.
⇒ The audio volume is set.
Need to allow increasing power consumption.
See Volume(Vol.) / Brightness cannot be set to the maximum value.
The button guide displays for Steps 1 and 2 can be skipped.
See "One-step operation."
Need to allow increasing power consumption.
See Volume(Vol.) / Brightness cannot be set to the maximum value.
Press any of the buttons.
Press the button just above the ▼mark on the back of the monitor to operate the buttons.
The button guide appears.
Press the [Luminance] button.
Adjust the brightness (luminance).
⇒ The brightness (luminance) is set.
Need to allow increasing power consumption.
See Volume(Vol.) / Brightness cannot be set to the maximum value.
The button guide displays for Steps 1 and 2 can be skipped.
See "One-step operation."
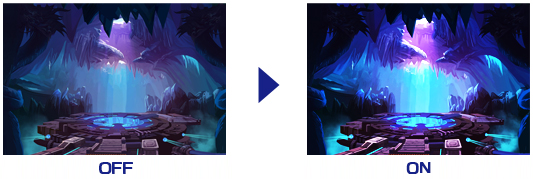
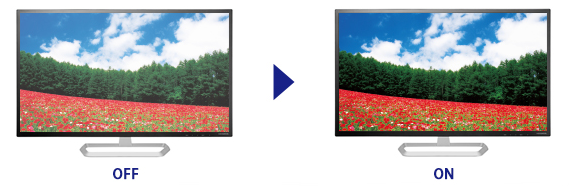
Your monitor is equipped with an illuminated logo on the back.
You can change the logo lighting settings.
There are four main logo lighting settings.
Logo brightness
Set the brightness.
Logo color
Set the illumination color. Set the color by selecting “red,” “green,” or “blue.” The “Custom” color you select will become the “logo color.”
Change Speed
Set the speed at which the logo lighting pattern changes.
Change Pattern
Select a change pattern.
Constantly lit
The logo remains constantly lit in the set color.
Breath
Adjust the brightness gradually in the following steps of bright → dark → bright.
Wave (←)
The illumination sweeps to the left.
Wave (→)
The illumination sweeps to the right.
Flash
The illumination flashes and then fades.
Reflect
The left and right waves sweep across the screen in turns.
Open [Illumination].
Set the desired illumination.
Press [Menu] to open the Main Menu.
Press any of the buttons.
Press the button just above the ▼mark on the back of the monitor to operate the buttons.
The button guide appears.
Press the [Menu] button.
⇒ The Start Menu opens.
Your monitor lets you register frequently used settings as “My Favorites.”
Settings registered as “My Favorites” are displayed in the Start Menu. You can adjust them without opening the Main Menu.
The three items marked ★ are “My Favorite Items.”
The “Contrast” and “Color Temp.” are set at the default values set when you purchase your monitor.
To register My Favorite settings, see “Register items as My Favorites.”
Select [Main Menu].
The Main Menu opens.
Select the items you want to set.
The button guide displays for Steps 1 and 2 can be skipped.
See "One-step operation."
Settings appropriate for various types of content are registered in your monitor by default.
These settings are called “screen modes.”
You can display clear and beautiful images simply by switching the display mode (detailed settings not required).
There are 5 screen modes.
Standard
Displays input images on the screen as they are.
Game
Beautifies game visuals by displaying them with enhanced clarity on the screen.
FPS
Adjusts the person-to-person (frames per second) FPS to display partners with high viewability.
RPG
Displays RPG game images vividly on the screen.
Web
Displays the web screen with enhanced clarity.
When the settings for your monitor are changed, they are registered in the current screen mode.
* The following screen mode settings are available:
Luminance, Contrast, Black Level, Color Temp., Gamma, NightCV, Enhanced Color, Enhanced Contrast, Color Depth, Over Drive, Through Mode, Super Reso., CREX, Quantization Range, Aspect Ratio, Blue Reduction 2, Logo Brightness, Logo Color, Speed, Pattern
* The registered screen mode settings can be reset to the default settings.
Select and press one of the screen mode buttons.
Select [Image] and open [Screen Mode].
Select a screen mode.
⇒ The monitor switches to another screen mode.
Images from another input source can be displayed on a “sub-screen” besides the regular screen (main screen).
The sub-screen setting switches with each press of the [On/Off] button.
PiP→PbP→Off→PiP…
2) Select [PinP/PbyP] and adjust the [PxP Mode] setting.
• Sub-screens are not available when“CREX” “S. Reso. Demo” “FreeSync Premium”“through mode” are enabled. Turn these functions “Off” to enable “sub-screens.”
• The sub-screen function cannot be used when displaying HDR video.
Press [Input] to change the input source providing the sub-screen image (the input source changes with every
press).
Press [Main/Sub] to switch the image between the main screen and sub-screen.
• Input Switch
1) Open the Main Menu with the buttons on the display.
2) Select [PinP/PbyP] and adjust the [Sub V.Source] setting.
• Main-Sub Switch
1) Open the Main Menu with the buttons on the display.
2) Select [PinP/PbyP] and open [Main/Sub Switching].
1) Open the Main Menu with the buttons on the display.
2) Select [PinP/PbyP] and adjust the [Audio Source] setting.
* This setting is available only for PiP.
1) Open the Main Menu with the buttons on the display.
2) Select [PinP/PbyP] and adjust the [PxP Size] setting.
* This setting is available only for PiP.
1) Open the Main Menu with the buttons on the display.
2) Select [PinP/PbyP] and adjust the [PxP Position] setting.
Various image display settings are available on your monitor.
Descriptions of the settings follow below. Select the settings you prefer.
Select settings appropriate for various types of content.
Adjust the difference between the bright and dark areas of the image.
Adjust the black tinge of the whole image.
Adjust the color tone of the image.
Adjust the contrast gradation characteristic to suit the image.
HDR responds to HDR signal input.
※ The HDR function is only compatible with HDMI images. DisplayPort images cannot be displayed in HDR.
This function brightens dark areas in images to make them easier to see.
This is convenient for games with many dark scenes.
The enhanced color function enhances the definition and vividness of the image.
The enhanced contrast function makes dark areas darker and bright areas brighter.
Contrast-enhanced images are optimum for photos and games.
The color depth function adjusts the color depth to display the image more vividly.
The overdrive function reduces ghosting in fast-moving scenes to enhance the perceived clarity even in fast-moving games.
At the same time, overdrive may cause color drift, color changes, etc. on the screen.
Use the burst when you want to increase the response speed, even if some ghosting may occur in games, etc.
Disabling certain image processing functions will reduce display latency during game play.
The time lag between the operation and display will be reduced in a quick-moving game.
※ Setting this function to [On] disables sub-screen displays and fixes the aspect ratio at [Enlarge].
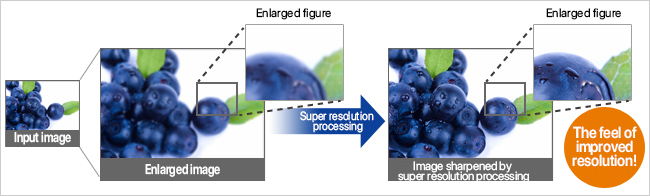
The super resolution function improves the perceived resolution of images: low-resolution images look sharper, even on large-size screens.
The image brightness is controlled slowly and naturally according to changes in the scene.
If the color of an image looks unusual, you can correct it by changing the setting.
Set the ratio between the height and length of the image. (Illustration)
The blue reduction 2 function reduces blue light, a common cause of eyestrain during computer use.
※ The color temperature cannot be adjusted when this function is enabled.
You can register and use My Favorites via the operating buttons on the main body.
Move to the item you want to register in “My Favorites.”
You can register the item just before setting it.
Example: Blue Reduction 2, Screen Mode, etc.
* Menu groups (such as images) and set values (such as a Blue Reduction 2 value of 5) cannot be registered.
* Some items cannot be registered.
With an item selected, hold down [Enter] for 3 seconds.
Select one of the three My Favorites frames to register the item.
⇒ The selected item will be registered (as in Favorites).
Replace previously registered items with the new items desired.
If the power lamp on the LCD is glaring, you can adjust its brightness.
Select [Major Operations] and open [Power LED].
Select an appropriate level or [Off].
⇒ The brightness of the power lamp changes.
Your monitor has a setting for reducing eyestrain.
The blue reduction 2 function reduces blue light, a common cause of eyestrain during computer use.
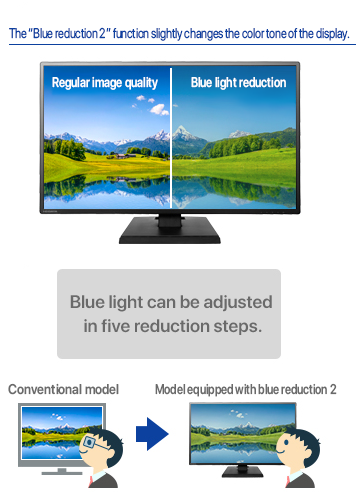
Select [Health Care] and open [Blue Reduction 2].
Adjust the intensity of blue light reduction.
A device connected with an HDMI cable can be operated with the remote for your monitor (CEC function).
Select [Others] and open [CEC].
Select [On].
⇒ An HDMI device can be operated with the remote for your monitor.
An HDMI device can be operated with the remote.
• Menu (CEC):
Use this key to open the device menu.
• Direction keys, Enter key, Return key:
Use these keys to operate the device menu.
• Enable the HDMI CEC function.
• Check if the HDMI device operates in response to the HDMI CEC commands.
• Some HDMI devices may be unable to perform some or all of their operations through HDMI CEC. These device operations are excluded from the coverage of the warranty coverage.
A press of a button for a given function may directly open that function without opening the button guide display that normally appears when the button is first pressed.
For example, a single press of the Audio Volume button opens the audio volume adjustment screen.
Select [Menu Display] and open [Direct].
Select [On].
⇒ The target item will open directly. The initial button guide will not appear.
• Input Source
Switches the input port display.
• Vol.
Adjusts the audio volume.
• Brightness
Adjusts the brightness of the screen.
• Menu
Displays the “Start Menu.”
• ★ Contrast
Adjusts the difference between bright and dark areas.
• ★ Color Temp.
Adjusts the color of the light.
• ★ My Favorites 3 (unregistered)
You can add items here as My Favorites.
• Main Menu
Displays the “Main Menu.”
For items marked with ★, you can register your favorite settings as My Favorites.
See “Register items as My Favorites.” for details.
* Depending on the displayed image, some setting options may not appear.
Screen Mode
Select settings appropriate for various types of content.
▶ Select one of the image display modes available (screen modes).
Contrast
Adjust the difference between the bright and dark areas of the image.
Black Level
Adjust the black tinge of the whole image.
Color Temp.
Adjust the color tone of the image.
Gamma
Adjust the contrast gradation characteristic to suit the image.
HDR
HDR responds to HDR signal input.
* The HDR function is only compatible with HDMI images. DisplayPort images cannot be displayed in HDR.
NightCV
This function brightens dark areas in images to make them easier to see.
This is convenient for games with many dark scenes.
Enhanced Color
The enhanced color function enhances the definition and vividness of the image.
Enhanced Contrast
The enhanced contrast function makes dark areas darker and bright areas brighter.
Contrast-enhanced images are optimum for photos and games.
Color Depth
The color depth function adjusts the color depth to display the image more vividly.
Over Drive
The overdrive function reduces ghosting in fast-moving scenes to enhance the perceived clarity even in fast-moving games.
At the same time, overdrive may cause color drift, color changes, etc. on the screen.
Use the burst when you want to increase the response speed, even if some ghosting may occur in games, etc.
Through Mode
Disabling certain image processing functions will reduce display latency during game play.
The time lag between the operation and display will be reduced in a quick-moving game.
* Setting this function to [On] disables sub-screen displays and fixes the aspect ratio at [Enlarge].
Super Reso.
The super resolution function improves the perceived resolution of images: low-resolution images look sharper, even on large-size screens.
CREX
The image brightness is controlled slowly and naturally according to changes in the scene.
Quantization Range
If the color of an image looks unusual, you can correct it by changing the setting.
Aspect Ratio
Set the ratio between the height and length of the image. (Illustration)
Power Save
Set the power-saving operation when your monitor enters standby.
Sig. Detect
Set the operation to take place when no image is input.
Quick Start
The quick start-up function reduces the delay before the screen appears.
Sync Setting
Changing this setting may fix problems in the image display.
* When displaying images from DisplayPort, the setting values are only 1 and 2.
Power LED
Adjust the brightness of the power lamp.
PxP Mode
The sub-screen mode function switches the status of the sub-screen.
* Sub-screens are not available when “CREX,” “S. Reso. Demo,” “Through Mode,” or “FreeSync Premium” are enabled.
Sub V.Source
The sub-screen image function switches the image displayed on the sub-screen.
Audio Source
Select the screen that will output sound.
PxP Size
Change the size of the sub-screen.
* This setting is available only for PiP.
PxP Position
Change the position of the sub-screen.
* This setting is available only for PiP.
Main/Sub Switching
The main-sub switching function switches the main screen and sub-screen.
Set the number of seconds the Settings Menu remains on screen (seconds until it disappears).
Language
Set the language for the Settings Menu.
Direct
Set the button guide display.
Video Info.
Set the image information to be displayed.
Rotation
Rotates the menu to match the display orientation.
Reset
The reset function restores the default settings at the time of purchase.
DDC/CI
Set DDC/CI communication with the PC.
CEC
Enables the operation of some HDMI device functions using the remote.
▶ Operate an HDMI device with the remote.
S. Reso. Demo
The super resolution demonstration mode function allows you to check the super resolution effect by putting the monitor into demonstration mode.
* CREX will be disabled. No sub-screen can be displayed.
System Update
The system update function updates your monitor’s system.
* There is no update information. If there is any, it will be informed on the Web site.
FreeSync Premium
Your monitor is compatible with the “FreeSync Premium” display synchronization technology.
Blue Reduction 2
The blue reduction 2 function reduces blue light, a common cause of eyestrain during computer use.
* The color temperature cannot be adjusted when this function is enabled.
Logo Brightness
Set the brightness of the illumination.
Logo Color
Set the illumination color.
Red
Set the illumination color. Set the “Logo Color” to [Custom].
Green
Set the illumination color. Set the “Logo Color” to [Custom].
Blue
Set the illumination color. Set the “Logo Color” to [Custom].
Speed
Set the speed at which the illumination pattern changes.
Pattern
Select the illumination pattern.
| Aspect Ratio | 4:3, 5:4 video | 16:9 video | 21:9 video |
|---|---|---|---|
| Resolution | 480p | 720p, 1080p | - |
| Example of resolution | 640x480, 1280x1024 |
1280x720, 1920x1080 |
2560x1080, 3440x1440 |
| Full Enlarge (zoom) the input signal without maintaining the aspect ratio |
 |
 |
 |
| Fixed Enlarge (smart zoom) the input signal while maintaining the aspect ratio |
 |
|
 |
* If the resolution is other than the optimum resolution (maximum resolution), the outline will be blurred due to the enlargement processing of the image.
The color of the screen looks unusual.
The image is blurry or stretched out in the vertical or horizontal direction.
No sound comes from the monitor.
The game display is delayed (latency).
Volume(Vol.) / Brightness cannot be set to the maximum value.
When using the sub-screen, the sub-screen was accidentally closed.
To remove the neck/base/stand.
Attach a monitor arm (VESA).
To see guidance on the setting items.
When you don’t know what to use for a DDC/CI.
You don’t know whether your LCD is HDR-compatible.
If the screen remains dark after waiting for about 2 minutes, check the power lamp.
The power is probably turned off.
• Press the Power button.
• Check if the power cable is inserted all the way.
• Check if the power cable is connected to the outlet.
In this case, no image can be received. See “The power lamp is orange or blue.”
No image can be received.
Disconnect the cable connecting your PC / input source with the monitor and reinsert it all the way.
Select the name of the input port to display in “Input Switch.”
Check the “external monitor output” setting in the user’s guide for your laptop computer.
If the screen remains dark after a wait of several minutes, try to change the [Sync Setting].
* If [Sync Setting] does not appear on the screen, go to the next step.
If the screen remains dark after a wait of several minutes, turn off the power of your PC / input source, wait a few seconds, and turn it back on.
If the screen remains dark after a wait of several minutes, contact the Support Center.
Try to change the contrast enhancement setting in the Settings Menu.
Select [Display] and open [Quantization Range].
Change the setting to [Full] or [Limited].
⇒ The problem will be resolved if the image signal and Quantization Range match.
If they do not match, change the setting to the other option.
If the problem remains, try the following procedure:
Try to reset your monitor in the Settings Menu.
(Write down the current settings, as needed.)
Select [Menu Display] and open [Reset].
Select [Execute].
⇒ The settings are reset.
Confirm that the screen is correctly displayed.
If the problem remains, try the following procedure:
Try the following procedure:
Set the PC resolution.
Low-resolution images are enlarged when displayed, which can change the aspect ratio or cause blurring of the screen or letters.
When you are in trouble >The image is blurry or stretched out in the vertical or horizontal direction. >
Example of setting procedure in WindowsSet the PC resolution to 1920x1080.
Low-resolution images are enlarged when displayed, which can change the aspect ratio or cause blurring of the screen or letters.
Right-click on your Desktop.
Click on [Display settings].
Click on [Screen Resolution].
Set the Display resolution to 1920x1080.
Click on [Detailed Display Settings], set the resolution in the displayed window, and click on [Apply].
Set the resolution and click on [Apply].
Some PC operating systems will only output to monitors after a sound output destination is set.
• Check the audio volume of your monitor.
• Check the audio volume of the PC / input source.
• Connecting headphones will mute the speakers of your monitor (when a headphone jack is provided).
Enabling the overdrive function may fix the problem.
Select [Game] and open [Over Drive].
Select a value.
⇒ The overdrive function is enabled. This will fix any ghosting in most types of image.
The burst applies a strong overload effect to increase the response speed.
In some cases, it may cause ghosting.
Use this mode when you want to increase the response speed in a game, etc. even if it results in ghosting.
If such a phenomenon occurs, it may be resolved by weakening the overdrive setting.
If you notice a time lag between the operation and display (display latency) in a quick-moving game, enabling the through mode may fix the problem.
Select [Game] and open [Through Mode].
Select [On].
⇒ The through mode is enabled.
Disabling certain image processing functions will reduce display latency during game play.
The time lag between the operation and display will be reduced in a quick-moving game.
In order to comply with the ERP standard, the maximum 'Volume(Vol.)' and 'Brightness' are limited.
On the screen displayed at the first startup, please agree to increase the power consumption.
If you are already using this product, you need to reset it. Write down the setting value so that you can restore it after resetting.
Select [Menu Display] and open [Reset].
Select [Execute].
⇒ The settings are reset.
When the following screen is displayed, select [Yes].
In this way, you can set the 'volume(Vol.)' and 'Brightness' to the maximum value.
Please set the setting value again after reset.
HDR video has been input.
The sub-screen function cannot be used when displaying HDR video.
No image can be received.
⇒ The power lamp is orange or blue.
Set the resolution.
⇒ The image is blurry or stretched out in the vertical or horizontal direction.
The menu is locked.
To enable the menu operation, hold down the second button from the left for 3 seconds.
If you do not have the user’s guide, you can download it from our Web page.
* For some models, the neck/base/stand cannot be removed, or a monitor arm (VESA) cannot be attached.
Your monitor displays explanations for the setting items on the menu.
See these explanations.
DDC/CI stands for “Display Data Channel Command Interface.”
By enabling this function, you can select the settings for the LCD from a PC. DDC/CI-compatible software is required to do so.
You can enjoy HDR content by connecting an HDR-enabled player such as an Ultra HD Blu-ray player.
* The HDR function is only compatible with HDMI 1, HDMI 2 images.
Visit “our website” and enter the model number of your monitor into the Search box on the upper right.
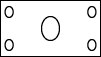
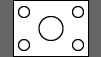
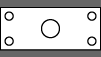
The light detector on the monitor is positioned as shown in the figure below.
Direct the remote at the light detector to send commands to the monitor.
This document describes how to print out a hard copy for use in your home or office.
 Print all pages (PC only).
Click on the button above. You can print out the whole manual using the print command in your web browser.
Note that some manuals have many pages and diagrams. You may prefer to print out only sections of interest.
We recommend that you open and print only the pages you need. You can print them out using the print command of your web browser.
* Depending on the content of the manual, it may take several minutes for printing to start.
* The [Print All Pages] button cannot be used on a smartphone or tablet.
Please see the following for the software license information used in this manual.


 The enhanced contrast function makes dark areas darker and bright areas brighter. Images appear sharp and well-defined as a result.
Adjust the image contrast ratio.
Adjust the luminance ratio between white (maximum luminance) and black (minimum luminance).
The higher the value, the sharper and more well-defined the image.
• Standard

• When the value is high, the image is sharp and well-defined.

• When the value is low, the image appears soft and natural.

The enhanced color function corrects the displayed colors by adjusting the chromaticity coordinate axes of six colors (RGB [red, green, blue] and CMY [cyan, magenta, yellow]) to give contrast.
The aspect ratio is the ratio between the height and length of an image. It is frequently expressed as 4:3, 16:9, etc.
Depending on the image resolution and the display settings, the image may be stretched in the vertical or horizontal direction, or some areas of the image may be cut off on the upper, lower, right, and left sides.
Set the image to the maximum display resolution or to the same aspect ratio as the display screen whenever possible.
• 16:9 image correctly displayed.

• 4:3 image displayed in 16:9. Image biased in the vertical direction.

• 4:3 image displayed in 16:9. Black bands appear on the right and left sides.

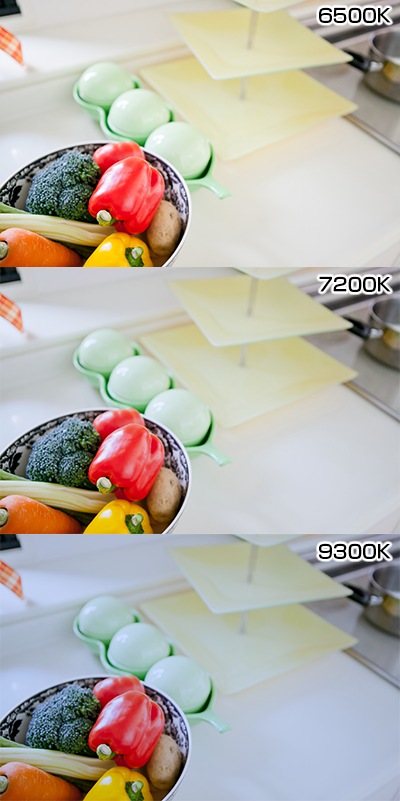
Color temperature. Adjust the color tone of the image.
A color temperature setting of 6500K corresponds to daylight color or a natural white.
A color temperature of 9300K is vivid but has a slightly bluish white quality.
A color temperature of 7200K is the intermediate setting between 6500K and 9300K.
Adjust the light of the screen. Appropriately adjusted brightness (luminance) reduces eyestrain.
• Standard

• Increase

The overdrive function instantly increases voltage changes during screen rewrites, thereby increasing the speed of color changes.
Although the color momentarily exceeds the intended color gradation when the voltage change is increased, the response time also increases. (The moving image seems to accelerate, dashing over the finish line and then snapping back.)
With overdrive, you are less likely to notice ghosting in fast-moving videos or games. The images look sharper as a result.
At the same time, overdrive may cause color drift, color changes, etc. for some images.
The blue reduction 2 function reduces blue light, a known cause of eyestrain for PC users.
• What is blue light?
The blue light emitted from displays causes eyestrain during PC use.
Long hours of exposure to blue light is also thought to disrupt the body clock.
Light wavelength and blue light

• What is the Blue Reduction 2 function?
This function can reduce blue light.
You can adjust blue light to suit your monitor use. You can reduce it, for example, when viewing photos or doing design work, or increase it when doing office work.
Super resolution. The super resolution function improves the perceived resolution of images: low-resolution images look sharper, even on large-size screens.
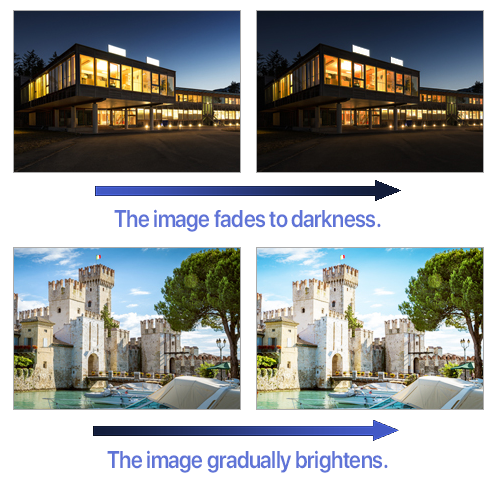
The CREX function controls the brightness of the backlight in real time to suit the brightness of the displayed image. The function can deepen the black of an already dark screen.
The CREX function controls the brightness of an image slowly and naturally according to the changing scenes. This makes it ideal for the viewing of movies, etc.
* Brightness does not exceed the luminance setting.
 HDR stands for High Dynamic Range.
 The PiP function displays a sub-screen within the main screen.
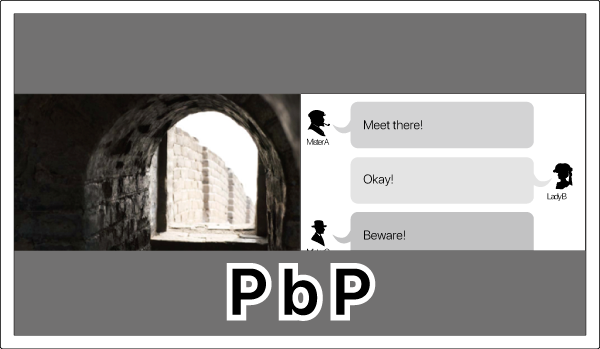 The PbP displays the main screen and a sub-screen side by side.
FreeSync is the brand name of AMD’s display synchronization technology.
The GPU (APU) controls the display rewrite timing for the display, which makes it possible to smooth out choppy operations and reduce screen disturbances.
The following conditions must be met before FreeSync can be enabled:
• Both the GPU (APU) and display are FreeSync-compatible.
• A FreeSync-compatible video driver is installed.
• The screen resolution is set to the maximum resolution for the display.
If an image is drawn onto the screen out of sync with the display rewrite timing, the image previously displayed will appear again. This phenomenon, sometimes called “stutter,” looks rough and choppy.
“Stutter” may occur when VSYNC is enabled.
Another problem called "tearing" can also occur. When the GPU (APU) provides an image as soon as the drawing is completed (VSYNC is disabled), a different image will be drawn in the middle of the display. Tearing can be a noticeable disturbance to the screen view.
”Tearing” may occur when VSYNC is disabled.
FreeSync prevents the occurrence of “stutter” and “tearing” by controlling the display rewrite timing of the display and rewriting the image on the display as soon as the GPU (APU) completes the drawing.
Note that the refresh rate is allowed to change to ensure that the drawing matches the display rewrite timing of the display.
In FreeSync, images are updated as quickly as possible after drawing.
An LCD can display the full range of RGB values (0 to 255). This is called full range.
Old-time TV sets displayed an RGB range of 16 to 235. This is called limited range.
(Modern TV sets support the full range.)
Your monitor automatically identifies whether the image signal is full range or limited range and displays the image accordingly (default value).
If the image and range don’t match, blown-out highlights or crushed shadows may occur, or blacks or whites may appear gray.
These problems can be fixed by changing the Quantization Range setting.